Pages

Wednesday, October 31, 2012

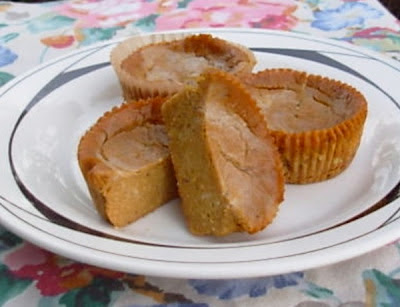
Vegan Pumpkin Cheesecake Cupcakes

Happy Halloween! Happy Samhain! Happy End of Vegan MoFo! That's a whole lotta celebrating to do! It was a push at the end, but I managed to do 20 posts for Vegan MoFo. What a journey!

This last post was supposed to be a big finale - pumpkin cheesecake cupcakes with gorgeous natural orange and green frosting. Did not work out, as my first attempt here explained. But since this was a recipe from Post Punk Kitchen, you can bet your bottom dollar that these cupcakes were scrumptous! There was a whole muffin tin of them when I started out, meant for the Halloween Party for the staff at the co-op tomorrow. Oops! Ate almost half of them! Yup, it's that good!

While this was my first pumpkin recipe of the season, it most certainly will not be my last. Look for more posts using pumpkin, my favorite winter squash by far!

Pumpkin Cheesecake Cupcakes (from PPK)
(makes 12)

1/2 cup whole cashews soaked in water for 2 to 8 hours or until very soft
1/4 cup mashed banana (about half of 1 medium-sized banana)
1 12 to 14 oz package silken tofu, drained
1/2 cup sugar
1/3 cup brown sugar
3 tablespoons coconut oil, at room temperature
2 tablespoons cornstarch
2 tablespoons lemon juice
2 1/2 teaspoons pure vanilla extract
1 teaspoon grated orange zest
1/4 teaspoon sea salt
1 3/4 cups canned pumpkin puree (or 1 15 oz can)
3/4 teaspoons ground cinnamon
1/4 teaspoons ground ginger
1/4 teaspoon ground nutmeg

Preheat oven to 375 degrees. Drain the cashews and place in a food processor and process until very finely chopped, scrapping down to get it all evenly chopped. Add the banana, tofu, sugar, brown sugar, coconut oil, cornstarch, lemon juice, vanilla, orange zest, and sea salt and blend until completely smooth and no bits of cashew remain.

Set aside 1/2 cup of batter. To the remaining batter, add the pumpkin puree, cinnamon, ginger, and nutmeg and blend until smooth. Place cupcake papers in a muffin pan and spoon in batter to 12 cupcakes, only filling it up 4/5 of the way full.  Randomly spoon dollops of the reserved batter onto the cheesecake. Poke the end of a chopstick into a batter blob and gently swirl to create a marble pattern; repeat with the remaining dollops. Bake for 50 minutes or until a toothpick inserted into a cupcake comes out clean.  Remove it from the oven and let cool on a rack for about 20 minutes, then transfer to the refrigerator to complete cooling, at least 3 hours or even better if overnight. Unwrap to serve or top with your favorite icing!

Hugs!

Recipes currently inspiring me:

Beet Cheesecake Bites at Ripe
Snowballs at Joanna Vaught
Sweet Potato Gnocchi at My Zoetrope

Tuesday, October 30, 2012

First Attempt (and failure) at Homemade Food Coloring - DIY Pantry

So the photo above is really pretty - and all natural! - and I really wanted it to work out. But, it was a food chemistry experiment, and as all creative people know, sometimes (often) the first try does not work, so sometime soon, I will post a successful recipe for using vegetable and herb sources to create your own DIY food coloring.

In case you are curious, what happened above was adding various vegetables and a few herbs/spices to almond milk, blending it and straining it several times. I used almond milk because this was food coloring for frosting. The plan was to simply add powdered sugar and margarine to create vegan buttercream frosting. The frosting was great but it diluted the color too much. Next try will be to make purer liquids - only using vegetable juice, not vegetables combined with almond milk. I'll post that soon, in time for Winter Holiday baking season.

By the way, the two pinkish purplish liquids look like they have things floating in them - they don't. That's just a reflection of the trees' leave above.

For the record, this is what I created, starting at the top with the baby chick yellow.

Baby Chick Yellow - 1 teaspoon turmeric
Yellow - 1 teaspoon saffron soaked in boiling water
Orange - 1 large shredded carrot blended with 1 cup almond milk
Purple - blend 1/2 shredded beet with 1 cup almond milk and add 1/4 teaspoon cider vinegar to set     color, plus 1 teaspoon of blue
Berry Pink - blend 1/2 shredded beet with 1 cup almond milk and and 1/4 teaspoon cider vinegar
Green - 12 leaves spinach pureed in almond milk
Blue - red cabbage boiled in water for 10 minutes, strain veg out (do not add to milk!) add 1/4 teaspoon baking soda

Back to the drawing board!

Hugs!

Monday, October 29, 2012

Vegan MoFo DIY Pantry Round Up

Wow! This is the 18th post during the Vegan Month of Food! That's a whole lotta vegan food! There are two posts left, kind of a finale of sorts which I'm very excited about it. The only thing I'll say is one is very colorful and the other is a dessert that features Pumpkin, for Halloween, of course!

I am pretty proud of sticking to my theme of including a DIY pantry item with every recipe - even the Iron Chef and Chopped Challenges - so to give myself a little pat on the back and a visual display of each DIY item, I present this round up.


The month kicked off with some fakin' bacon, made of adzuki beans and buckwheat, which was featured in a BLT.


Next came my first dessert, Limoncello Macaroons with Lemon Icing. Both the limoncello and the preserved lemons were DIY, but since I hadn't written a post on the limoncello, the recipe is courtesy Local Lemons.


Spinach Pesto was my next DIY pantry item and it was served with Beet Ravioli, the first Iron Chef Challenge: Secret Ingredient - Beets!


Simple, easy to make, Herb Fermented Cashew Cheese. And the ingredient that makes it all ferment? Rejuvelac! The whole point of DIY pantry items is to make it cheaper and quicker at home.


Caramel Flan made with DIY Pantry Vanilla Extract. Wow, this was a show stopper: for it's simplicity, it's unbelievable texture, and it's amazing taste. Coming soon to my next dinner party for sure!


The buckwheat crust was the DIY ingredient in this Kale, Cashew Ricotta, and Olive Tart; kind of stretching the theme a bit, but the tart was so delicious, I decided it was worth it!


Next up was the Chopped Challenge of Butternut Squash, Apricot Preserves, Rosemary and Popcorn! My Sweet and Spicy Butternut Phyllo Rolls has some DIY Pantry Chipotle in Adobo, perfect combo with the apricot preserves and rosemary salt!


Back to the savory side of things and a Chick Pea Cutlets with Cashew Parmesan Sauce with DIY Pantry Tomato Sauce. Homey food inspired by Italian peasant cooking, this may have been my favorite dish of the month!


The final Iron Chef Challenge included potatoes of any sort and sesame. Since I already had plans for sweet potato latkes, it was simple to shift continents and make the dish an Asian inspired Sweet Potato Cakes with Cashew Sour Cream, which included sesame oil and other Thai flavors.


Quinoa is one of those trendy ingredients that I always seem to be at a loss for incorporating into my standard fare, until I hit upon this brilliant idea: stuff mushrooms with it! Add DIY Pantry Slow Roasted Tomatoes and they are a masterpiece!


Ahhh, Vegan Buttermilk Sausage Biscuits. Life is good! Although it was the first time making them, the sausages were the DIY Pantry item here, and many are frozen in my freezer because they were so good!


Buffalo Style inspired Kickin' Mock Chicken Pizza with DIY Pantry Hot Sauce that will warm your whole house when ole man winter blows through, this was so good that I wished there was some more waiting in the freezer! Luckily, there is more pizza dough and more hot sauce, so more pizza for everyone!


Whew! So much food, so many blogs I've discovered and so many new cookbooks purchased! Guess I'll just have to top it all next year! Happy vegan eating!

Hugs!

Sunday, October 28, 2012

Kickin' Mock Chicken Pizza

 Ever since discovering the "Buffalo" combination, I have been a life long fan. As a cook at Jaggers' restaurant in Atlanta, GA, I used to fry up the wings and send them out hot and spicy.

Wings are best made in a deep fryer, so I rarely made them at home. But a few years ago I had a hankering for them and figured out a way to make a traditional version using the oven. Recently I veganized them. But my latest version involves pizza! Specifically, it was Dagwood's Kickn' Chickn' Pizza that inspired me; use hot sauce for the red sauce, sliced tempeh on top with cilantro and drizzles of ranch dressing. Fantastic!

This is the second copycat pizza I have made inspired by Dagwoods' Pizza, the first being BBQ Tempeh Chicken. But this was the first vegan pizza I made, using vegan cheese. I used a combination of the Daiya and Lisanatti brands of mozzarella, since I find the taste of the Lisanatti better although the Daiya melts better. I found it to be a good mix, but feel free to work with whatever you prefer.

Kickin' Mock Chicken Pizza

pizza dough for 12" pie
1/2 cup hot sauce (DIY Pantry)
4 oz tempeh
2 bay leaves
1 sprig thyme
4 fresh sage leaves
1 cup water
1 tablespoon olive oil
2 cups vegan mozzarella, shredded
small handful cilantro, chopped
2-3 tablespoons vegan ranch dressing (DIY Pantry)

Preheat oven to 500 degrees. Steam tempeh with bay leaves, thyme and sage leaves for 15 minutes. Drain water and discard herbs. Cool tempeh for 10 minutes then slice into six 1/2" pieces and if desired, quickly sear on high heat in olive oil to give them a crunchy edge.

On floured baking sheet, spread pizza dough out to desired size. Smear hot sauce around, leaving 1/2 inch border. If you sauce is really fiery, spread very thinnly; the hot temperature of the pizza will increase the heat of the hot sauce in your mouth! Sprinkle mozzarella over top, top with tempeh and bake for 13-16 minutes or until crust is lightly browned and cheese is bubbling. Remove from oven and sprinkle cilantro over top and drizzle with ranch dressing. Serve immediately.

Hugs!

Recipes currently inspiring me:

Dreamy Creamy Tofu Pickle and Pea Salad at K's Veg Recipes
Apple Cider Donuts at Leaves and Flours
Avocado Coconut Lime Tart at Just the Food

Friday, October 26, 2012

Hot Sauce - DIY Pantry

Some pantry items I go through like nobodies business: vinegar, olive oil, mustard. So it made so much sense to start making my own vinegars and mustards. Hot sauce just wasn't one of those until I discovered Chesapeake Tempeh Cakes which required hot sauce. Then I went through all of my hot sauce in a hot minute! When I realized how obsesses I was with those cakes hot sauce went on to my DIY pantry list in a hurry!  Luckily, we just finished a super hot growing season here in Southern California and the Farmers' Markets were awash in red jalapenos. Hot Damn!

It turns out that making your own hot sauce is pretty simple - saute onions, garlic, hot peppers in oil and then puree with water and vinegar and jar. For this batch I had 20 red jalapenos and another 10 green serranos which I added fearing the jalapenos might be too sweet (!) since they were red rather than green. Ha ha ha ha! I'm sure the hot chili gods had a good laugh over that one! None the less, this is a wonderfully hot, hot sauce!

You'll notice from the photo that it looks really thick, which was intentional since this sauce will soon be spread on a pizza crust for my next posting. After that recipe, I'll thin it out with a little more vinegar so that it shoots out of the jar instead of plopping. And in case you're wondering, the jar it is in was from some store bought hot sauce; couldn't resist reusing it!

Jalapeno Hot Sauce (from this recipe)
(makes 1 1/4 quarts)

20 red jalapenos, chopped
10 serranos, chopped
5 cloves garlic, minced
1 cup onion, minced
2 tablespoons olive oil
2 cups water
1 cup cider vinegar
1 teaspoon salt

In large skillet, saute onion and garlic in oil for 2 minutes and add peppers. Cook for 3-4 minutes or until they just begin to soften. Add salt and water and stir, cooking another 20 minutes, stirring often. Remove from heat and allow to cool 10 minutes. Place in blender and puree until very smooth, adding in cider vinegar. Jar and refrigerate. Refrigerated, sauce will keep for up to 6 months.

Hugs!

Recipes currently inspiring me:

Spaghetti with Broccoli Cream Pesto at Smitten Kitchen
Big Bird-Free Bahn Mi at Pamela's Modern Family Table
All Purpose Mushroom Marinade at My Plant Based Family

Tuesday, October 23, 2012

Vegan Buttermilk Sausage Biscuits

Biscuits with sausage were my secret guilty pleasure for the last years of my 15 year stint as a vegetarian. Specifically McDonald's Sausage Biscuits. Truly, a super secret guilty pleasure. I had them once a year on the way to the beach with my mom. I know, it sounds like a food horror story from my childhood, but I freely participated in this one.

Lately I've been totally addicted to making biscuits with cider vinegar and almond milk as my "buttermilk." I found the recipe at Holy Cow (a great blog, check it out if you are not familiar with it). I now know the recipe by heart! What's even better, is that it's easy to make only 2 or 3 and then there are no leftovers (old biscuits are N.G. no good!)

I toyed with the idea of using the Field Roast (bought with the coupon I won through Vegan MoFo) as the sausage for this sausage biscuit, but upon finding this sausage recipe from hell yeah it's vegan, I knew the DIYer in me would win out. (By the way, I bought the Wild Mushroom Field Roast, highly recommend it!)

Vegan Buttermilk Sausage Biscuits
(makes 6-8)

1 cup very cold almond milk
1 teaspoon cider vinegar
2 cups all-purpose flour (the original calls for 1 cup all purpose and 1 cup whole wheat pastry flour)
2 1/2 teaspoons baking powder
1/2 teaspoon baking soda
1/2 teaspoon salt
5 tablespoons margarine, cut into small cubes, placed in the freezer for at least 20 minutes

In small container mix vinegar and almond milk and set aside to curdle for at least 5 minutes. In medium mixing bowl, combine flour(s), baking powder, baking soda, and salt and blend well. Add well chilled margarine and cut into the flour, either using two knives or a strong fork, until the margarine is well blended and the flour resembles coarse cornmeal. Stir in the almond milk and form into a ball, and refrigerate for 15-20 minutes. Preheat oven to 450 degrees. Remove dough from refrigerator. Sprinkle a little flour on clean counter or cutting board and roll dough out to 1/2 inch thickness, and fold it in half. Roll one more time and fold in half. Cut out disks of dough using biscuit cutter or an upside down glass. Combine scraps from cut biscuits to create last ones and brush tops with olive oil. Bake for 13-15 minutes until golden brown on top. Remove from oven and serve with your favorite faux sausage.

Hugs!

Recipes currently inspiring me:

Jackfruit Carnitas and Yam Fries at Veggie Fixation
Seaweed and Ranch Dressing at Just the Food
Spicy Rapini Stuffed Girasoli at 4 Every Kitchen

Sunday, October 21, 2012

Quinoa Stuffed Mushrooms with Slow Roasted Tomatoes

One of the joys of blogging is spending countless hours surfing through your favorite blogs, reading their first posts, digging out lots of goodies that you missed and of course bookmarking tons of fun recipes. If you haven't spent some quality time tooling around Smitten Kitchen, put it on your calendar. Great recipes, hilarious writing and always inspiring. It was her version of stuffed mushrooms from 2006 that lit the fuse for my variation above.

Stuffed mushrooms are a classic fancy comfort food. The delicious umami savoryness of sauteed mushrooms with butter, breadcrumbs, cheese and parsley is a staple of many a decent cook's fancy repertoire. But I wanted to update them, creating a version that was vegan, gluten free, made with pantry items and of course, stunningly delicious!

After a recent score of 20 lbs of San Marzano roma tomatoes at the farmers market, I knew that I was going to slow roast at least half of them to create better than sun-dried tomatoy goodness. My friend Eve introduced me to the idea at her blog Garden of Eating and I've been hooked on them ever since.

The critical trick to making these stuffed mushrooms perfect is a quick bake of the empty caps to get them to release some of their juices so your filling isn't soggy. As the caps are baking, you prepare the filling, making this a quick and easy appetizer, side or part of a main meal depending on your mood. Add a salad and you've got the perfect lazy afternoon meal!

Saturday, October 20, 2012

Thai Sweet Potato Cakes with Cashew Sour Cream

 Here it is October 20, which means only 11 days of Mofo left! Twelve posts done and another eight at the least (although it will probably be closer to 12) to go. Whew! What a ride!

And this weekend we got another Iron Chef Challenge:

Potatoes and Sesame

I almost said no way, I'm worn out! Gotta gear up for the big finale! But luckily, my next post was for sweet potato latkes, to go with the cashew sour cream. And for a myriad of reasons, the post kept getting postponed. Now I know why! So I could rejigger it for Iron Chef!

Diners, for your review, please allow me to present Thai Sweet Potato Cakes with Cashew Sour Cream. Decidedly Thai flavors of cilantro, toasted sesame oil and lime pair with sweet potatoes and fresh chilies. Top with cashew sour cream and a side of quick radish pickles, and your tastebuds will overcome your brain's confusion at finding a potato cake with Thai flavors!

Thai Sweet Potato Cakes with Cashew Sour Cream
(makes 12-20 cakes)

1 sweet potato
1 fist size red or white potato
4 jalapenos or other green chili, minced
1/4 cup ground flax seeds
1/4 cup toasted sesame oil
1 tablespoon agave nectar
1 cup loose packed cilantro, minced
1/2 teaspoon Thai red curry paste
1 teaspoon almond milk
1 teaspoon salt
oil for frying (sunflower, safflower, peanut)
cashew sour cream (DIY Pantry)
lime wedges

Combine flax seeds with enough water to make a thick but pourable paste and set aside to rest. Grate potatoes on large shredder holes into large mixing bowl. Add cilantro, chili, agave nectar, salt, and sesame oil and mix well. Combine thai red curry paste with almond mix and blend well. Add flax mixture and curry paste mix to vegetables and mix very well, using your hands if necessary.  Heat large skillet over medium low heat for 3-4 minutes. Add thin layer of oil and swirl to coat bottom of pan. Drop 1/4 cup of mixture into pan and flatten and cook on each side until nicely browned. Add oil as necessary and repeat until all of batter is fried. Remove to paper towel to blot off excess oil and serve with cashew sour cream and wedges of lime.

Hugs!

Recipes currently inspiring me:

Pumpkin Ice Cream with Candied Pepitas at Vegan Dad
Mandarin-Ginger Tofu at Tofu Mom
Cheesy Kale Chips at Earth Remedy

Thursday, October 18, 2012

Cashew Sour Cream - DIY Pantry

Dairy sour cream never held any wow for me, no particular reason why. Unlike other people who swooned over it on their nachos, baked potatoes, whatever, I always gave away my extra, making friends along the way. But this cashew sour cream? Keeping this bowl for myself!

I just whipped it up tonight so there is no official report of how long it keeps it structure, but I'll update you in a few days. It is smooth and creamy and tangy, full of fluffy peaks and valleys. Tomorrow it will be topping some sweet potato latkes, so look for that recipe!

Speaking of the bowl, it is hand crafted by my marvelously talented sister Emily, who is a potter and made these little bowls especially for my blogging use, to beautifully display dips and sauces, so adorable! Shameless plug for her work which you can see at her Facebook page - Pottery Gal - she sells it at the Block Island Farmers' Market in the summer season, so if you happen to be on The Block, check her out!

Cashew Sour Cream (from The Gluten Free Vegan)
(makes 1 cup)

1 cup raw cashews, soaked at least 6 hours
1/4 cup water1/4 teaspoon salt
1-2 teaspoons apple cider vinegar
1 lemon, juiced

Combine all ingredients in blender and puree until very smooth, scraping down the sides if necessary. Serve chilled.

Hugs!

Recipes currently inspiring me:

Butterscotch Blondie Oatmeal Cookies at Cinnamon Spice & Everything Nice
Fall Plum Torte at Stacey Snacks
Makhani Gobi -  Cauliflower in Creamy Tomato Sauce at ECurry!

Tuesday, October 16, 2012

Chickpea Cutlets with Cashew Parmesan Sauce

Despite my seriously Scandanavian name, I grew up surrounded by Italians - 'Eyetalans in their parlance, and Sicilian at that. Lots and lots and lots of red sauce! My first job was a mom and pop restaurant where I was first introduced to pizza, calzones and scacciatas. That is also where I first discovered breaded, baked goodies called "parmesan" - everything from mozzarella to eggplant and plenty of meat as well. Truly, there is so little that is better than breaded food, slathered in good red sauce and topped in cheese (wait, isn't that a pizza? Just about, I rest my case!)

When first I spied Isa Chandra's Chickpea Cutlets my first thought was, "Vegan Parmesan!" And so that is what I made, and they were good, and my mother, a happy carnivore, will never be the same again, thank you Isa Chandra!

Actually, my pride at restraining myself until the middle of Vegan MoFo before using one of the Vegan Goddess' recipes is quite full to bursting, so pats on the back are all around. All I can say is if you haven't tried these patties yet, what are you waiting for? Smother them in mushroom gravy, make a burger out of them or crumble them on your Cesar Salad (brilliant idea!) but make them now!

The recipe is for a "double batch" which makes 8 good size patties, but next time I will double that, because these are the best thing to have in your freezer when you get the lazies and just don't want to face cooking (which never happens, ever! right?!)

In keeping with my theme of DIY Pantry, I used my own very simple homemade tomato sauce, which can be found here.

ChickPea Cutlets with Cashew Parmesan Sauce
(Serves 4) 

4 chickpea cutlets (recipe from Veganomicon, also on Post Punk Kitchen) 
1 batch tomato sauce (DIY Pantry)

Parmesan Cashew Sauce
2 cups cashews, soaked at least 6 hours
3 tablespoons plant milk (I used almond)
2 tablespoons nooch
2 teaspoons light miso
1 teaspoon salt
pepper to taste

Puree cashews with all ingredients in sauce until smooth and pourable, but thicker than pancake batter. Heat tomato sauce if not making it fresh, and spoon over freshly fried cutlets (or warm them in a toaster oven until hot in the middle). Spoon parmesan sauce over red sauced cutlets and sprinkle with fresh oregano if desired.

Hugs!

Recipes currently inspiring me:

Homemade Wheat Thins at Smitten Kitchen
Vegetarian Stuffed Grape Leaves at An Edible Mosaic
Mexican Green Rice at Simply Recipes 

Sunday, October 14, 2012

Sweet 'n Spicy Butternut Phyllo Rolls with Popcorn and Rosemary Salt Topping

Welcome to Chopped! Vegan Brunch version, courtesy of Vegan MoFo. Our challenge was to make a brunch item using the following ingredients: Butternut Squash, Apricot Preserves, Rosemary and Popcorn! Whew! Quite a challenge, but I am so excited to present my dish: Sweet 'n Spicy Butternut Phyllo Rolls with Popcorn Rosemary Salt Topping. Yes, it's a mouthful but oh what a delicious one!

Musing on what to make lead me down the cake/muffin/baked good lane, but that seemed too predictable, especially with apricot preserves thrown in there. My brunch favorites definitely tend toward the savory side, but the squash and preserves really brought sweet to the table so I knew I needed a counter weight to those two strong ingredients. Recalling a marinade I made with apricot preserves and chipotle in adobo, I knew that would work beautifully, and it would help me with my Vegan MoFo theme of using a DIY Pantry item in every post, perfect!

Using phyllo dough is one of my favorite ways to fancy up any dinner, and with some already waiting in the freezer, that was a done deal. If you have never worked with phyllo dough, check out my Phyllo Without Fear post.

Now for popcorn! I am so curious to see who got really creative with that ingredient because it seemed that using it as a topping was the only way to go! There is rosemary in the filling and in the popcorn topping, just because I love the flavor and thought a rosemary salt with add a little pizazz to the popcorn topping. Such fun!

Thank heavens we had more than 30 minutes to make our brunch Chopped creations. Mine definitely took a couple of hours! All of the dish washing probably ate up some of that time, but really, the things we don't know about reality cooking shows! Like what happens to the extra food that doesn't make it onto the plated dishes for the judges? Do the crew get to eat it? Just saying!

Saturday, October 13, 2012

Kale, Cashew Ricotta and Olive Tart

I'm not gonna lie folks, this post was supposed to be a "healthy" one - kale, buckwheat crust and all. So while I though it would be good, it was with happy surprise that my first bite had my eyes rolling back in my head in ecstasy. Yes! Super delicious!

This recipe certainly "took a village" at least in the way it came together. It started when Stacey Snacks posted a ricotta and artichoke tart and that went into my "to make" file. Then Eats Well With Others wrote about a buckwheat crust that sounded divine (and a good way to break out of my current rut of wheat 24/7). Adding a cashew ricotta was a no brainer but I wanted a recipe that was test-driven rather than mucking up one on my own and possibly wasting those expensive organic cashews. Enter Happy Healthy Life. Lastly, I have been meaning to try the "partially frozen olive oil" approach to making a crust ever since I spied it on PPK's 100 for 2011. Worked like a dream! It's my new favorite way to make crust, and I LOVE crust!

Is there a prize for best cobbled together recipe pulling from other good ideas? No matter, mimicry is the highest form of flattery, or so I've been told.

It looks like a long recipe, but you can make it in pieces - the cashew ricotta and crust the night before - and then all you have to do is bake off the crust while you're sauteing the kale. Gorgeous meal that's healthy, gluten free and delicious!

Kale, Cashew Ricotta and Olive Tart
(makes a 9 inch tart)

Kale Filling
1 bunch kale, washed and destemmed, cut in ribbons
1 cup onion, cut in slivers
5 cloves garlic, minced
2 tablespoons olive oil
10 oil cured olives, pitted

Sautee onion and garlic in olive over over medium heat until just beginning to brown. Add kale and stir well to incorporate with onion and garlic. Allow kale to wilt then remove from heat.

Cashew Ricotta (adapted from Happy Healthy Life)

1 1/2 cups cashews, soaked at least 8 hours
1/4 cup lemon juice
1/2 teaspoon salt
1/3 cup water
3 cloves garlic
black pepper
pinch cayenne  

Combine all ingredients for cashew ricotta and puree in blender until very smooth.

Buckwheat Flour Crust (inspired by Eats Well With Others)

2 cups buckwheat flour
2/3 cup olive oil, frozen (see this post)
1/2 teaspoon cider vinegar
1 teaspoon salt
2-3 tablespoons ice water, as needed
To make the crust, add the buckwheat flour and the salt into the bowl of a food processor and pulse until combined.  Scoop out frozen olive oil and add to bowl of food processor and pulse.  Add vinegar thru opening in the top of processor lid and then add cold water a tablespoon at a time and stop whenthe dough just barely holds together.  Form the dough into a disk, wrap it in parchment paper (or plastic), and chill for at least 30 minutes or overnight.

To assemble the tart, preheat oven to 400 degrees. Remove dough from refrigerator and roll out on parchment paper and fit into 9 inch tart or pie pan, pressing to fit. Bake for 10 minutes. Remove and allow to cool for at least 20 minutes. Spread 2/3 of cashew ricotta on bottom of crust, top with cooked kale and dot top with remaining cashew ricotta. Sprinkle chopped olives on top and bake for 30 minutes until ricotta begins to brown.

Hugs!

Recipes currently inspiring me

Stuffed Chard Leaves with Creamy Chive Sauce at Thyme for Cooking
Cheezy Vegan Mushroom and Red Pepper Lasagna at Chez Cayenne
Tarragon Oil at 101 Cookbooks

Thursday, October 11, 2012

Vegan Caramel Flan

I cannot start another post exclaiming that desserts are not my thing - someone is bound to remind me of the famous Shakespearean quote, "Methinks the lady doth protest too much." And it's true. Even my protests sound false as they keep issuing forth from my slack-jawed mouth. Who would have thought that it would be vegan desserts that would have turned me!

All of this is just a prelude to the gorgeous flan pictured above. Of course I was nervous making it, having never made an egg-based flan and having no idea what it should look like as I proceeded through the recipe. But let me tell you dear readers, it is simple, it is easy, it is made with pantry ingredients and it tastes fantastic!

The secret is agar powder, that gelling ingredient made of seaweed (!!!) that makes jiggly wiggly deliciousness (such as Chocolate Pudding Pie and Grasshopper Pie). Having never made anything caramel before either, that was also intimidating, but it all worked out nonetheless. In fact, the caramel was so easy that do not be surprised if you see some sort of homemade salted caramels coming to this space soon!

A word of advice on the caramel; if you are using individual ramekins, do not be tempted to pour more than 1 teaspoon of the liquid caramel into the base when you are building the flan, thinking that it will give you that much more caramel Goodness. Not only will it be wasted since it hardens into a diamond-hard surface that will not be released when it is time for serving. But you will need to pour countless cups of boiling hot water over it to dissolve the rock hard caramel in order to clean said ramekin.

A note on portions: the recipe below is for 2 individual size, 4 inch round ramekins, so double or quadruple if you are making a family size flan in a larger pan.

Vegan Caramel Flan (from The Gothic Homemaker)
(serves 2)

Caramel
1/4 c cane sugar
1 1/2 tablespoons water

Custard
1 cup coconut milk
1/2 teaspoon agar powder
3 tablespoons cane sugar
1/4 teaspoon salt
1 teaspoon cornstarch
2 teaspoons water
2 teaspoons vanilla extract (DIY Pantry)

Add coconut milk to a medium saucepan and sprinkle with the agar-agar powder. Whisk in the sugar and salt, and bring the mixture to a boil over medium-high heat. While it comes to a boil, whisk together the cornstarch and 2 teaspoons of water in a small bowl and add this slurry to the custard mixture. Reduce the heat to low and cook, stirring often, for 5-7 minutes, or until the mixture has thickened. Keep it simmering over a very gentle heat, stirring it as often as possible to prevent it from prematurely setting up, until the caramel is ready.

Place the sugar and water in a small sauce pan and stir to combine. Over medium-low heat stir the mixture every few minutes until it begins to bubble vigorously. Turn heat down to simmer and keep an eye on it as it will quickly start to turn an amber color. When the caramel is a deep, golden color, quickly pour 1 teaspoon of caramel into each of the 2 6-oz. ramekin dishes. Let it sit for 1-2 minutes. It will begin to harden immediately.

Turn off the heat under the custard and stir in the vanilla. Pour the custard into the caramel-glazed ramekins, cover with plastic wrap, and refrigerate for at least 1 hour, preferably overnight.

To remove the flan from their ramekins, run a knife around the sides of the flan and then dip the bottoms into a bowl of very hot water for 10-15 seconds; invert onto a serving plate and drizzle any additional caramel over them.

Hugs!

Recipes currently inspiring me:

David Rocco's Hot Hot Hot Chili Pesto at Recipes from 4 Every Kitchen
Chocolate Peppermint Ice Cream Sandwiches at Chez Cayenne
Fusion Tacos with Sesame Carrot Coleslaw at Just the Food

Tuesday, October 9, 2012

Herb Fermented Cashew Cheese

I know, when you first saw the picture you thought, "no way that is vegan cheese, and made out of nuts? Who does she think she's fooling?" But it's true my friends, this is a) vegan, b) fermented (so I can technically call it cheese according to my French friend), and c) amazing tasting. And you too can make such a delicious creamy vegan cheese!

No fancy equipment nor difficult ingredients, I promise! When PPK listed their top 100 of 2011 and noted the craze of fermented vegan cheese, I knew that I was soooooooooo far behind the vegan train that making this cheese was at the top of my list. Many of the recipes I found online called for using probiotic capsules, which surely works easily. But being a hardcore DIYer (and eyeing the price of a bottle of probiotics) my fermented cheese is made with rejuvelac.

Rejuva what?

Rejuvalac. In case you missed my last post, rejuvalac is a healthy tonic of yore, made from sprouted seeds. With a slightly sour taste and a bit of effervescence, it is essentially a liquid probiotic you can make at home for pennies. So of course that's what I did. Using rye berries instead of the more common wheat, I soaked and sprouted the berries and produced rejuvalac which then got blended with soaked cashews and were allowed to ferment for 48 hours on my kitchen counter. And voila! Creamy and slightly tangy fermented cashew cheese!

 Sure you can leave the cheese as is, but wanting a little more pizazz, I added lots of herbs and garlic powder to give it a Boursin like flavor. For those of you less inclined to the DIY side, you can buy bottled rejuvelac in natural food stores, but the bottle at my store was a whopping $10 and when I realized with a little time I could make it for about 50 cents at home, well there was no choice!

UPDATE: Veganosaurus let me know that if you keep a little bit of fermented nut cheese from your first batch, you can just added it to your next batch without adding additional rejuvelac and it will ferment it for you! Yeah! Love fermentation!

SECOND UPDATE: I wanted to state for the record that I was introduced to Miyoko Schinner's Artisan Vegan Cheese after doing this post, and am trying to buy the book ASAP (Grrrr, Powells.com does not have it in stock!) Not to toot my own horn, but I am not making a recipe from her book without giving her credit. Just wanted to be clear!

Herb Fermented Cashew Cheese
(makes 2 cups)

2 cups cashews, soaked in water for at least 8 hours
2 tablespoons rejuvelac (DIY Pantry)
1 tablespoon garlic powder
2 teaspoons dried oregano
2 teaspoons dried thyme
2 teaspoons dried basil
1 teaspoon salt

Drain cashews and add to blender along with the rejuvelac. Puree until very smooth, scraping down the sides as needed to make it all combine. The puree should be thick but not so thick that it doesn't move in the blender. Add 1/2 teaspoon of rejuvelac at a time to increase flow of blending cashews. Pureed cashews can have a little texture. Remove from blender and place in cheesecloth and set in colander set inside of a bowl. Cover cheese with cheesecloth and allow to sit on kitchen counter for 24 to 48 hours, tasting for flavor after 24 hours and allowing it to ferment longer if you want a tangier cheese. Combine herbs and salt in bowl and add to cheese and blend thoroughly with a fork and refrigerate.

Hugs!

Recipes currently inspiring me:

Spinach Crepes with Ricotta, Tomatoes and Basil at Cinnamon Spice & Everything Nice
Oyster Mushrooms Rockefeller at BitterSweet
Corn and Black Bean Quesadillas with Roasted Zucchini Salsa at Closet Cooking

Monday, October 8, 2012

Rejuvelac - DIY Pantry

Timetraveling was one of those magical things that I always wanted to do as a kid (and wrinkling my nose like Tabitha from Bewitched to make things go poof!) Timetraveling would have come in handy so I could meet all of my western frontier heroes, be a pioneer woman like Laura Ingalls Wilder and live with the Indians - I was so born out of my time! Notice a theme here? Making everything from scratch because back then there were no grocery stores with packaged goods, only bulk supplies!

And what does all of this oversharing of my childhood dreams have to do with the strange looking liquids in the jars above? That is homemade rejuvelac, a very old-fashioned health drink that I discovered in Wild Fermentation. Rejuvelac is a liquid probiotic drink derived from soaking grains, sprouting them and then drinking the liquid flavored by the sprouted grains. Very little effort (but some time investment) to produce a super healthy probiotic drink that keeps your internal system working like clockwork but more importantly is great for fermenting nut cheese!

Traditionally, rejuvelac is made with wheat or rye berries, but just for kicks (and for those of you who are gluten free) I made a batch with white quinoa too (not pictured). I preferred the rye version for its more sour flavor (like good sour dough) since the quinoa had a distinctively sweeter taste. While I have only used it in fermenting cashew cheese, I am curious to experiment with it to see if I can use it in baking or making nut yogurt, ala Tongue Ticklers' post on curdling cashew milk with the stems of fresh green chilies!

If you want to use another grain, it's the same proportions as listed below. And in case you haven't discovered Sandor Katz aka Sandorkraut do check him out. Making fermented food is the chemistry homework you wished you'd gotten in high school!

Rejuvelac
(makes 2 cups)

2 cups rye berries
4 cups water
1 quart mason jar

Place rye berries in jar and add 4 cups water and cover with cheesecloth or clean cloth and secure with a rubber band and allow to soak in dark, cool place like your cupboard for 24 hours. Drain off liquid after 24 hours and rinse well. Drain and recover and secure with rubberband and place back in cool, dark place for 12 hours. Repeat three more times as berries begin to sprout. After rinsing and draining four times and berries have little tails, fill with water and recover and allow to soak for 24 hours. Pour off resulting rejuvelac and refrigerate covered. It will taste slightly sour and fizzy and is a good drink for improving your digestion as well as being a liquid probiotic. Keeps for up to 2 weeks in the refrigerator.

Hugs!

Recipes currently inspiring me:

Eggplant Bounty Pie at Stacey Snacks
Asian Pear and Lemon Cucumber Salad with Rosemary Molasses Tempeh at Keeping it Kind
Baked Orzo with Eggplant and Mozzarella at Smitten Kitchen

Sunday, October 7, 2012

Beetroot Ravioli with Spinach Pesto

My first foray into real cooking was egg pasta, specifically Bolognese style lasagna. It was my last year of college and since no rolling pins were to be found in my corner of Atlanta, I used an empty wine bottle to roll out my egg pasta - it was spectacular!

Since then I have made lots of pasta, but all of it was egg based. Faced with VeganMoFo's Iron Chef challenge of making a post with Beetroot, I knew that it would make the perfect substitute for eggs in fresh pasta, and boy was it ever! Just looking at the color of the dough it produces made me want to eat all of this! And tossing it with a fresh spinach pesto was the perfect color and flavor match.

I have to confess that when I make pasta I never measure anything, just adding a little more flour, a little more milk as I go until the consistency is correct. The same is true of my pesto, and sometimes your measuring eye is off, as it was this time around. After adding in too much salt (yikes!) the beet greens were added to the spinach to absorb the salt. No harm, no foul, and it didn't discolor the pesto or change the flavor as I feared! So if you're feeling thrifty, make beet green pesto.

Yes, this does take time but it is so worth it! Looking to wow dinner party guests? Make fresh pasta, and when it looks like this, people will love it before they even taste it. While having a ravioli press lying around is probably not that common, nor are donut pans but having awesome toys for the kitchen are what keeps it so much fun!

Beetroot Ravioli with Spinach Pesto
(makes 24 ravioli)

2 cups all purpose unbleached flour
1 whole beet, peeled
3-4 tablespoons almond milk
1 whole beet
1 cup cashews, soaked at least 4 hours
1/2 teaspoon salt

Pesto
1 bunch spinach, well washed
1/4 teaspoon salt
1/3 cup pine nuts (or walnuts)
1 clove garlic
1/2 cup olive oil
1/3 cup nutritional yeast
black pepper to taste

Cut up the peeled beet and place in blender with 1 tablespoon of water and pulse to puree, scraping down the sides to puree all. Set aside.

Place other beet in deep pot of water and bring to boil and cook until tender. Drain and rub off skin. Cut into small pieces and mash well. Drain cashews and add 1 cup of cashews to blender along with mashed beet and 1 tablespoon of water and puree to create filling. Add pinch of salt and pepper to taste. Set aside.

Pour flour out on clean counter and make well in the middle of the flour. Add pureed raw beet and 3 tablespoons almond milk. Using a fork carefully combine the mixture, adding more almond milk as needed to create soft but non-sticky dough. Knead for 4-5 minutes until dough feels smooth and elastic. Sprinkle counter with flour and roll out dough as thin as possible using rolling pin. If you have a ravioli mold, make ravioli according to instructions. If not, dot 1 teaspoon of cooked beet filling on dough, 1 inch apart from each other, fold over dough and press to close. Use a knife to cut ravioli into squares or fluted wheel if you have it. Repeat until all of pasta is used.

To make pesto, combine all ingredients in blender and pulse until very well blended. Taste for salt and pepper. Cook ravioli in large pot of salted boiling water. When pasta floats to top and turns a darker color, it is done. Drain, saving a little of the cooking water and toss with pesto. Serve immediately.

Hugs!

Recipes currently inspiring me:

Homemade Double Stuf Oreos at Cinnamon Spice & Everything Nice
Carrot Apple Latkes at An Edible Mosaic
Grilled Halloumi and Peaches with Dukkah at My New Roots

Friday, October 5, 2012

Soba Noodles with Spicy Peanut Sauce


Lots of folks are trying to cut down on the wheat or gluten in their diet, and while there are plenty of substitute non-wheat noodles out there, don't pass by soba noodles without giving them a try. A traditional noodle from Japan soba noodles are made of buckwheat flour, milled from a grain that is not related to wheat despite its name. Soft and nutty soba noodles are great in broth soups or tossed with flavorful sauces as I made here.

Spicy peanut sauce is another traditional Asian sauce, spiked with garlic or ginger and chilies. I use chili oil since it reduces the ouch factor of biting into a fresh chili in the sauce. But if peanuts are a problem for you, feel free to substitute another nut butter like cashew, almond or even sunflower butter; the proportions are the same as the recipe listed below.

Wednesday, October 3, 2012

Limoncello Macaroons with Lemon Icing

Desserts were never my thing until I started exploring vegan cooking. True story. More bread and butter or fried potatoes over any kind of sweet has always been my choice. And then it happened, I mashed up two recipes for macaroons and it all came apart.

Inspired by Chocolate Covered Katie's 4 minute macaroons and 101 cookbooks limoncello macaroons, I smooshed them together to make vegan, limoncello macaroons with lemon icing, and an addiction was born.

I always scoffed (silently of course) when people so solemnly told me how they were addicted to sugar, and how it was such a struggle to break the habit. Secretly, I had a hard time believing that sugar was truly addictive; homemade bread on the other hand was another story. But after making just 8 of these incredible coconut concoctions and eating three without blinking, I knew the truth of this sugar addition they speak of. Luckily, my car was full of gas and I rushed the remaining macaroons off to my place of work and was able to secretly dump the offending sweetlings in the staff breakroom without anyone being the wiser. Very close call!

Limoncello, for those of you who are novices, is a delightful sweet liqueur Italian in origin that involves steeping the zest of lots of lemons in vodka for several weeks, straining it and adding simple syrup. It is served frostily cold in a shot glass and savored after dinner or with dessert. Winter is the perfect time to make this at home when the citrus season is in full bloom, and while I have made plenty of limoncello, my blog doesn't have a specific post on it. So please check out Local Lemon's post on how to do it. The preserved lemons were added because I delight in using them whenever possible. They add such an interesting lemony-salt flavor that they will be the mystery ingredient that will keep guests guessing for hours! 

Limoncello Macaroons with Lemon Icing
(makes 8)

1 cup shredded coconut
2 tablespoons almond flour or rice flour
1/3 cup coconut milk
2 tablespoons agave (or other neutral sweetener like brown rice syrup)
1 tablespoon limoncello (make it yourself)
1/2 preserved lemon, minced super fine (DIY Pantry)

Icing
1/2 teaspoon almond milk
4 tablespoons confectionery sugar
1/2 teaspoon limoncello (make it yourself)

Preheat oven to 350 degrees. Combine coconut, almond flour, coconut milk, agave, limoncello and preserved lemon and mix very well. Drop tablespoon size of the batter onto a baking sheet lined with parchment paper. Bake for 15 minutes. Remove from oven and allow to cool for at least 30 minutes (or refrigerate to speed the process). While the macaroons are baking, mix the icing and refrigerate to allow it to harden. Once the macaroons have cooled, drizzle icing on top. Refrigerate in tightly sealed container or eat immediately.

Hugs!

Recipes currently inspiring me:

Cheddar Corn Cakes with Green Onion Sour Cream at Cinnamon Spice & Everything Nice
Salted Caramel Chocolate Shortbread Bars at Eats Well With Others
Leek, Chard, and Corn Flatbread at Smitten Kitchen

Tuesday, October 2, 2012

Vegan BLTs

It's October. Daylight grows shorter, mornings are getting nippy, and you're hungering for some fall soups and stews, right?

Wrong, if you're living in SoCal! We're getting hit with another heat wave, and yes, the tomatoes are still gorgeous in the farmers market. Jealous? Well I'm missing said fall mornings and gorgeous leafy autumn foliage, so it's my consolation prize. And having a batch of vegan bacon always at the ready in the freezer, per this recipe, Vegan BLTs make perfect sense.

It's hardly a recipe, just another reason to crow about how great the vegan bacon is, and DIY no less! It's my second day of VeganMoFo and I'm thoroughly enjoying calling myself a MoFoer!

In case you never made one, here's the recipe for a BLT, for one (double as needed!)

Vegan BLT
(serves 1)

2 slices bread, toasted (for extra crunch)
2-4 slices fresh tomatoes, depending on the size of your tomato
Vegennaise to taste
Lettuce
Vegan Bacon (DIY Pantry)

If you're using store bought vegan bacon, follow the instructions to cook it. If you're using homemade, fry it up in a pan and set aside. Spread vegennaise liberally on toast, top with tomato, your fakin' bacon and lettuce and cut in half.

Hugs!

Recipes currently inspiring me:

Chocolate Cupcakes with Basil Buttercream Frosting at Eats Well With Others
Creamy Shrimp, Corn and Zucchini Orzo at Cinnamon Spice and Everything Nice
Swiss Chard Panade at Stacey Snacks

Monday, October 1, 2012

Fakin' Bacon - DIY Pantry

If you had told me a couple of years ago that I would love eating a faux meat made with buckwheat and adzuki beans I would have laughed you out of the country! Seasoned pork is what made me fall off the vegetarian wagon five years ago in addition to frustration with all of the unpronounceable ingredients in packaged fake meats. Making my own was a disaster, so I succumbed to eating the real thing. 

But the vegan revolution of the past couple of years has altered my life forever.

This is day one of VeganMoFo! Let's all do a happy dance!

Nearly two years ago when The Ordinary Vegetarian posted this vegan bacon recipe I tucked it away in my to do file, but wasn't sure I was going to actually try it while I was still an omnivore. But as a returning vegetarian well on my way to veganism, I wanted to see if it really was easy and delicious as Sarah claimed. Happy to report it is!